Difference between revisions of "Technical Direction"
| Line 15: | Line 15: | ||
'''Rigging''' | '''Rigging''' | ||
| + | |||
Several entirely new rigs were created for use in TWO. | Several entirely new rigs were created for use in TWO. | ||
The [[Squetch Rig]], [[FACE]] and [[Hand Gizmo]] were incorporated into the TWO [[Characters]] to help [[Animators]] create believable characters. | The [[Squetch Rig]], [[FACE]] and [[Hand Gizmo]] were incorporated into the TWO [[Characters]] to help [[Animators]] create believable characters. | ||
'''Key Groups''' | '''Key Groups''' | ||
| + | |||
{{:Key Groups}} | {{:Key Groups}} | ||
Revision as of 06:32, 1 December 2007
Elements in an animated movie must be carefully designed and crafted, refined and tested to meet requirements of the movie, the intent of the Director and the needs of the Animators. Often more than a general knowledge of Modeling, Rigging and Programming is required. Difficult problems require subject matter experts.
All tools are not optimal. All ideas and inventions cannot be implemented. Discovering what works best, on time and on budget, is very important work.
These challenges are met by the Technical Director.
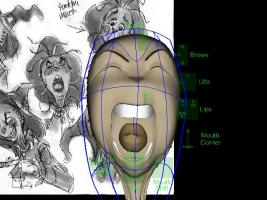
Extreme Poses and Exaggeration
David Walker tests the possiblities using an animated Distortion Cage.
Rigging
Several entirely new rigs were created for use in TWO. The Squetch Rig, FACE and Hand Gizmo were incorporated into the TWO Characters to help Animators create believable characters.
Key Groups
What it does : Force's keyframes for a group of bones via an ON/OFF pose.
How it works: Takes advantage of the new V13 IK/FK auto constraint keying feature. Using dummy constraints and Null to define what bones to key and what type of key frames to set.
Characteristics
Speed : Can turn a ten step process into a one step process. E.g. setting keys for all the F.A.C.E nulls or blocking out an animation quickly. Ect.
Efficiency : Could possibly save setting thousands of extra keys. Especially if filters are not used correctly. Key Groups only sets keys that are needed for the bone. E.g. A control bone that can only be rotated will only be set with rotation keys. This helps keep the curve editor cleaner and easier to use..
Simplicity : It’s easy to set up new bone groups and modify existing groups. You don’t have to worry about what filters or bone modes to use. It doesn’t matter how many groups or what kind of groups you make. The actions will work on another model with different groups or without key groups. So you can customize to your liking. Easy to transfer groups to other models.
How to use: In an action or choreography open pose slider window select Key Groups tab. You will see some bone groups. Every time you turn the pose ON or Off it will set predefined keys for the Group. If you are using the timeline tack the bones folder in the action or choreography.
How to set up a new group.
1. Make a new ON/OFF pose 2. Select a control bone 3. If the bone can only be rotated add a “orient like” constraint and constrain to “key Groups Null” then set the enforcement to 0% 4. If the bone can be translated also. add a “translate to” constraint the same way. 5. Rename the pose and in the properties panel drag pose into the Key Groups folder.
Technical Director's Comments
Bob Croucher wrote the Key Groups and Drag and Drop Poses features and offers the following advise concerning their usage:
Pros and Cons
The majority of what is accomplished with key groups can be accomplished by creating a simple pose, with keyframes created on the bones which you want to key. Place translate keys, on some bones, rotate keys on others, scale on others, or combinations of these on others. Now to generate these keys on a new action you can just drag this pose (you can even drag poses from the pose slider window) onto the action or chor window. This pose will be pasted into your current action at the current frame. To do manual hold keys later in the action, you can use force keyframe with "all model", and since the correct keys already exist, new keys will be dropped on these channels.
Much time has been spent in discussion describing why Key Groups are cool. All of these statements are true. I won't repeat all those benefits here. Most of the benefits also apply to Drag/Drop poses.
Advantages of Drag/Drop Poses:
- Drag/Drop Poses are easier to create than Key Groups. (no Nulls, no Constraints)
When it is time to use them, it takes just one step instead of two, just drag/drop instead of Turn ON then OFF.
- Drag/Drop Poses are easier to understand how they work, since it is not a side effect of an obscure feature.
- Drag/Drop Poses are lightweight, and add nothing to the realtime evaluation speed of the model. The only cost is paid at the time the pose is dropped. Key groups add permanent constraints to every bone upon which they act. These constraints have to be evaluated at every frame. You may see a list of these constraints by selecting the bone's transform and choosing Select/Driver. Key groups also require additional Null bones. Every bone added to a model is another one to traverse and evaluate at every frame. This lightweight vs heavyweight issue is the single biggest advantage of Drag/Drop poses.
- It is a painless process to convert Key-Group poses to Drag/Drop poses, but not the other way around. To create them, create a new action, use the key group pose (turn it ON, then OFF), now delete the key group's pose channel you just created, but leave all the keys it created. Now use the Action/Create Pose menu. This new pose, is a drag/drop style pose containing the same channels. You can now delete the Key-Group pose and rename your newly created Drag/Drop pose appropriately.
- Drag/Drop poses can create channels on pose motion, muscle motion, and any other animatable property, whereas Key-Groups can only create motion on the types of channels that constraints affect. Those are Translate, Scale, and Rotate channels.
Disadvantages of Drag/Drop Poses:
- Drag/Drop Poses cannot be used to force keyframes later in an action when the bones have been moved. The drag/drop will move the bones back to their default position, as was keyed in the pose. For this you must use Force Keyframe on all existing keys on the model, which in some cases may create more keys than you wish, since it keys everything you have animated.
- Drag/Drop poses are filtered by the Keymode filters. This is good and bad. It means that you can drop only a portion of your Drag/Drop pose if you want. For example, you could get just the translate keys, or just one specific branch of bones. The downside is that you have to remember to check the key modes before you drag/drop.
I hope this helps to understand the differences and pros and cons of each feature.
Back to Technical Direction
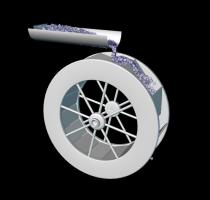
Fluids
See also:
Contributors

